Contrary to popular belief, effective rustproofing is not about a single pre-winter application, but about interrupting a year-round electrochemical reaction with the right science.
- Annual, dripless oil sprays are scientifically proven to work via capillary action, while electronic modules are largely ineffective on a vehicle’s mixed materials.
- Parking in a heated garage can quadruple the rate of corrosion unless a specific cold-rinse and humidity control protocol is followed.
Recommendation: Adopt a « Million Kilometer » strategy: an annual oil spray in late summer, combined with bi-weekly undercarriage flushes during winter, to preserve your vehicle’s structural integrity for over a decade.
For any Canadian car owner planning to keep their vehicle for more than a few winters, the battle against rust is not a matter of ‘if’, but ‘when’. Every season, tons of corrosive road salt are spread across our highways, creating a brine that splashes into every nook and cranny of a vehicle’s underbody. Many owners believe a quick pre-winter treatment or regular car washes are enough. They might hear about various solutions, from dealer-offered electronic modules to thick, black undercoatings, and assume all are created equal. This conventional wisdom, however, often leads to a false sense of security.
The reality is that rust is not simply a cosmetic issue; it is an electrochemical reaction that actively compromises your vehicle’s mechanical strength. The fight against it is less about a single action and more about a consistent, scientific strategy. The common approaches often fail because they don’t address the core physics and chemistry of corrosion—how moisture and chlorides attack steel, the failure of certain methods to penetrate critical seams, and how our own habits, like parking in a warm garage, can catastrophically accelerate the process. True vehicle preservation goes beyond surface-level treatments; it requires understanding the mechanisms of failure.
But what if the key wasn’t just blocking salt, but actively displacing the moisture and neutralizing the chemical reaction at a microscopic level? This guide moves beyond the platitudes. We will dissect the science of corrosion, debunk ineffective methods, and provide a clear, evidence-based strategy to protect your car’s structural integrity. By understanding the metallurgy and adopting a long-term mindset, you can transform rustproofing from an annual chore into a calculated plan that preserves your vehicle’s safety and value for a decade or more, even in the harshest Canadian conditions.
This article provides a comprehensive roadmap for long-term vehicle preservation. Below, you will find a detailed breakdown of the critical topics we will cover, from choosing the right technology to understanding the final line between cosmetic rust and a critical safety failure.
Summary: The Definitive Guide to a Rust-Free Vehicle in Canada
- Oil Spray vs Electronic Modules: Which actually stops rust in Canada?
- Why waiting until the first snowfall is too late for rustproofing?
- The subframe failure that can make your car uninspected and illegal
- Does parking in a heated garage accelerate salt corrosion?
- How to flush salt from hidden crevices without a pressure washer?
- The hidden rust spots that make 80% of Ontario classics a bad investment
- When does body rust become a structural safety failure?
- The « Million Kilometer » Mindset: Fighting Salt and Thermal Shock
Oil Spray vs Electronic Modules: Which actually stops rust in Canada?
When selecting a rustproofing method, a vehicle owner is presented with two fundamentally different technologies: the physical barrier of an oil spray and the theoretical protection of an electronic rust module. From a metallurgical perspective, the choice is clear and backed by overwhelming evidence. Electronic modules, often sold at a high price point by dealerships, purport to work by impressing a small electric current through the vehicle’s metal to disrupt the electrochemical process of rust. However, this principle, known as cathodic protection, is effective on submerged and continuous metal surfaces like pipelines or ship hulls. A car, with its countless separate metal components, plastic parts, rubber bushings, and painted surfaces, is not a suitable candidate for this technology. The « Faraday cage effect » further limits its reach into hidden cavities, rendering it largely useless for protecting the areas that need it most.
In contrast, annual oil-based sprays, particularly light, dripless formulas, work on a simple yet highly effective principle: capillary action. These low-viscosity fluids are designed to creep into the tightest pinch welds, seams, and hidden cavities, displacing any trapped moisture and forming a protective, self-healing barrier directly on the metal. This physically prevents oxygen and electrolytes (saltwater) from contacting the steel, thereby halting the corrosion reaction. The evidence against dealer-applied solutions is damning; a study highlighted by the Automobile Protection Association (APA) found that 85% of dealer-applied rustproofing left one or more high-risk areas unprotected. This is why the APA and other consumer advocacy groups do not recommend electronic modules but endorse professional annual oil sprays.
The long-term cost and effectiveness further cement the superiority of oil sprays. The table below outlines a typical 10-year scenario for a Canadian vehicle, demonstrating that while the initial cost of an electronic module is high, its poor performance offers a low return on investment.
| Factor | Electronic Module | Annual Oil Spray (Krown) |
|---|---|---|
| Initial Cost | $800-1200 | $150 |
| 10-Year Total Cost | $800-1200 | $1500 |
| Effectiveness on Mixed Materials | Poor (plastics/rubber don’t conduct) | Excellent (physical barrier) |
| Protection of Hidden Areas | Limited (Faraday cage effect) | Superior (capillary penetration) |
| Battery Drain Risk | Yes (winter concern) | None |
| Professional Endorsement | Not recommended by APA | Endorsed by APA |
Furthermore, a landmark 2006 study by the Canadian Department of Defense subjected various compounds to severe environmental testing. The results showed that a light, oil-based product, Corrosion Free Formula 3000, exhibited the most significant corrosion inhibition among all tested compounds, proving the real-world efficacy of this technology in environments mirroring harsh Canadian winters.
Ultimately, choosing an annual, light oil spray is not a matter of opinion, but a decision based on proven material science and extensive third-party testing.
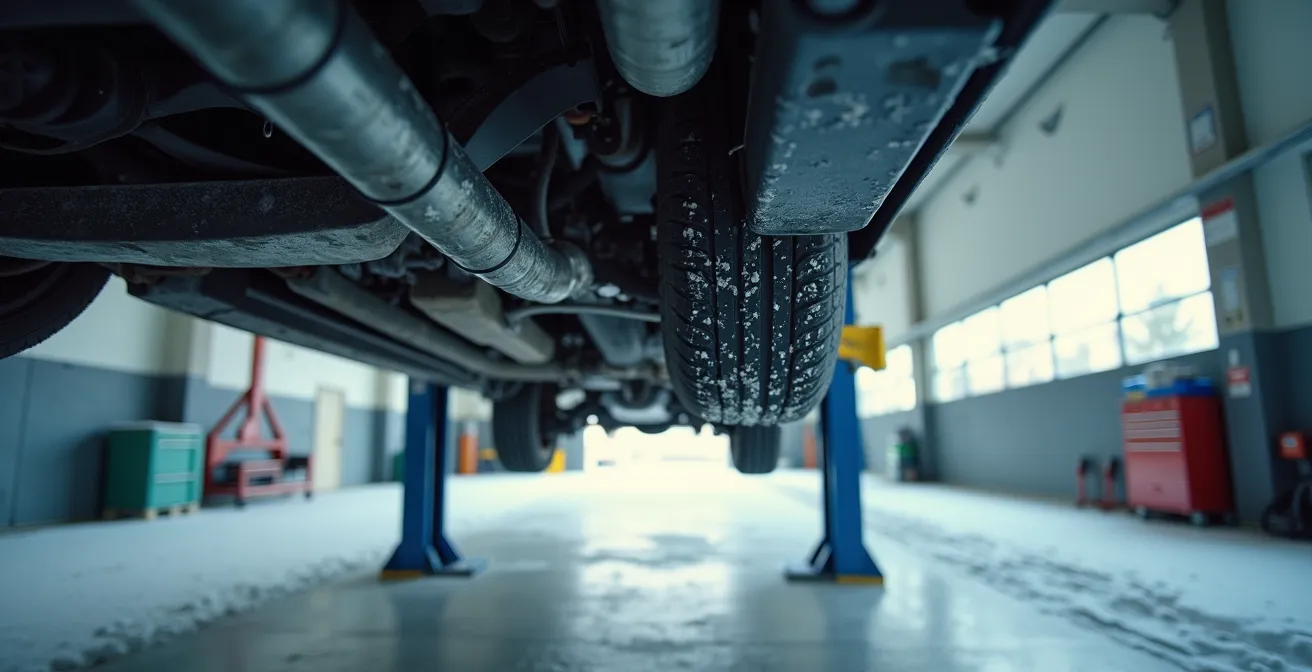
Why waiting until the first snowfall is too late for rustproofing?
The most common mistake Canadian car owners make is viewing rustproofing as a reactive measure to winter. They wait for the first weather reports of snow, then rush to book an appointment. This approach is fundamentally flawed because by the time the first salt trucks are out, the window for an optimal application has already closed. The goal of rustproofing isn’t to apply a coating over existing salt and moisture; it’s to create a pristine, bonded barrier on a clean and completely dry surface. Applying oil spray over a damp or salt-contaminated undercarriage traps the corrosive agents against the metal, potentially accelerating rust in the very spots you’re trying to protect.
The ideal time for rustproofing is during the late summer or early fall, specifically in August and September. During this period, the ambient temperatures are warm, and the vehicle’s underbody is at its driest. Warmth is a critical factor; it lowers the viscosity of the oil spray, allowing for maximum capillary action and deeper penetration into seams and crevices. Applying the product when it is cold and viscous drastically reduces its ability to creep into the most vulnerable areas. Furthermore, application shops are less busy during this off-season, leading to better availability, more meticulous service, and no risk of a technician rushing the job.
This macro view of a rocker panel’s pinch weld illustrates the problem perfectly. Long before visible rust appears, microscopic salt crystals become embedded in these seams, creating a hidden reservoir for moisture and corrosion.
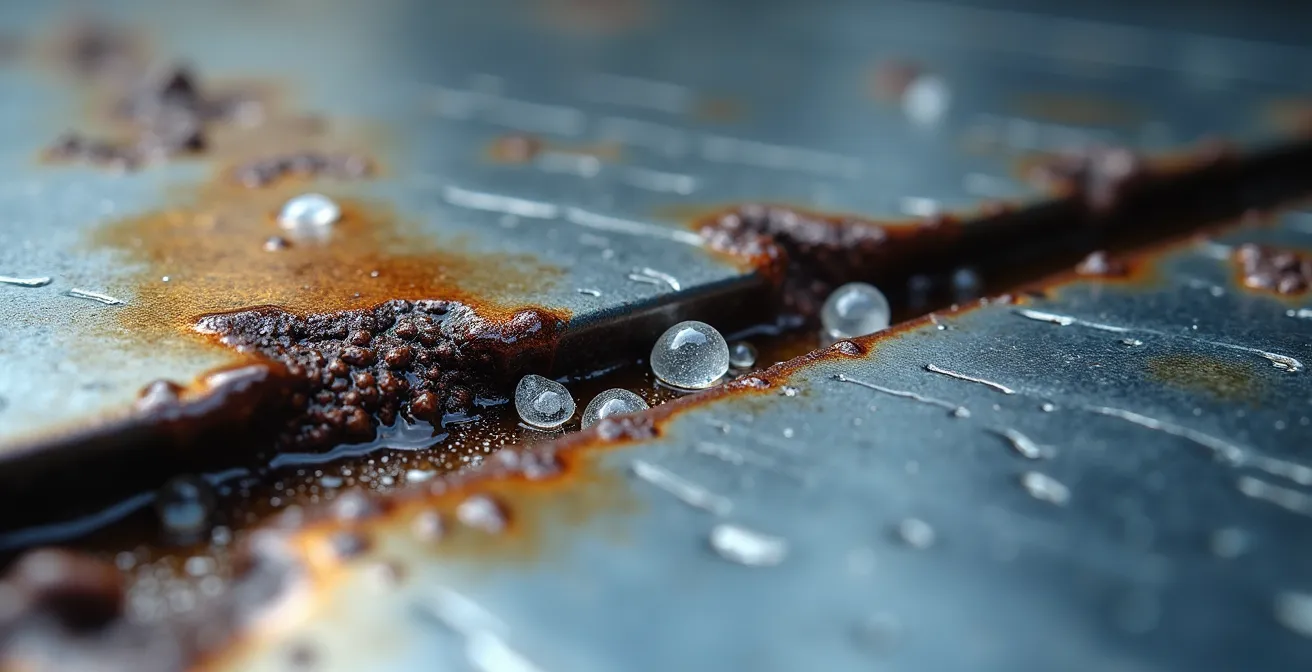
As you can see, once these salt crystals are trapped, even a high-pressure wash may not dislodge them. Applying a treatment at this stage is a compromised solution. The only way to ensure complete protection is to treat the vehicle when the metal is clean, dry, and free of any contaminants, which is only possible before the salting season begins. An annual reapplication during the same late-summer window creates a layered, robust defense that will last for years.
Think of it like painting a house: you would never apply paint to a wet or dirty wall. The same logic applies with even greater stakes to protecting your vehicle’s frame.
The subframe failure that can make your car uninspected and illegal
While many owners worry about visible rust bubbles on a door or fender, a metallurgy expert focuses on the unseen threats to structural integrity. The most dangerous corrosion occurs on the vehicle’s frame, subframes, and suspension mounting points. These components are the skeleton of the car, responsible for managing immense dynamic forces. When they are weakened by perforating rust, the consequences can be catastrophic. A compromised subframe or strut tower can fail under load, leading to a sudden loss of control. This isn’t a theoretical risk; it has led to massive recalls, particularly in Canada and the US « rust belt » states.
Case Study: The Toyota Tacoma Frame Recall
One of the most infamous examples of structural corrosion involves certain model years of the Toyota Tacoma pickup. The frames were found to be so susceptible to road salt corrosion that they could rust through completely. In the most severe cases, the frames would literally crack, potentially causing the vehicle to break in half while in motion. This led to a massive recall and buyback program in North America, costing the manufacturer over a billion dollars and highlighting the severe safety implications of inadequate frame protection.
In Canada, vehicle safety is regulated at the provincial level. In Ontario, for example, a vehicle must pass a Safety Standards Certificate (SSC) inspection to be registered as « fit. » Any perforation (a rust hole) in a structural component of the frame or body is an automatic failure. This means a car with a rusted-out subframe is not just unsafe; it is illegal to operate on public roads. It cannot be legally sold or even re-registered until prohibitively expensive repairs, often involving the replacement of the entire frame, are completed. This is the point where a vehicle’s value drops to zero overnight.
Because these issues are often hidden behind plastic covers or deep within the undercarriage, a thorough inspection is critical before purchasing any used vehicle that has seen a Canadian winter. The following checklist outlines the key areas a savvy buyer or diligent owner must examine.
Your Action Plan: Pre-Purchase Structural Rust Inspection
- Structural Mounts: Check front strut towers for any signs of swelling or perforation around the main mounting bolts and plates.
- Suspension Cradles: Inspect rear suspension cradles and the points where the subframe bolts to the main unibody for flaking or deep scale.
- Hidden Panels: Use a bright flashlight to examine the metal structure behind plastic rocker panel covers and fender liners.
- Pinch Welds: Look for any signs of rust bubbling or bleeding through the paint along the pinch welds at the bottom of doors and the tailgate.
- The Magnet Test: Gently slide a small magnet along lower body panels, frame rails, and wheel arches. If it fails to stick in some areas, it may indicate the presence of thick plastic body filler hiding severe rust damage.
Ignoring the health of your vehicle’s frame is not just neglecting maintenance; it’s gambling with safety and financial viability.
Does parking in a heated garage accelerate salt corrosion?
It is one of the great ironies of Canadian car care: the very act of providing your vehicle with a warm, sheltered garage in winter can dramatically accelerate its demise. Many owners pull their snow-and-salt-covered car into a heated garage, believing they are protecting it. In reality, they are creating a perfect storm for corrosion. Rust is an electrochemical reaction, and like most chemical reactions, its rate is highly dependent on temperature. A frozen, salt-covered car sitting in a -10°C driveway will rust very slowly. The saltwater solution is frozen or near-frozen, and the reaction is largely dormant.
When you move that same car into a +15°C garage, you introduce a massive thermal shock. The snow and ice melt, bathing the undercarriage in a highly concentrated saltwater solution. This temperature increase acts as a powerful catalyst. As a general rule, the rate of rusting can increase by 4 to 5 times with a 25°C jump in temperature. Your heated garage transforms from a safe haven into a corrosion incubator, allowing rust to attack the vehicle’s metal aggressively all night long. The added humidity in the enclosed space further contributes to the problem.
However, this does not mean you must abandon your garage. It means you must adopt a strict protocol to mitigate the risk. The goal is to remove the catalyst (salt) and control the environment (humidity) before the heat can do its damage. This requires a disciplined approach every time you park your car after driving on salted roads.
Heated Garage Protocol for Canadian Winters
- Rinse with Cold Water: Before pulling into the garage, use a hose to give the undercarriage, wheel wells, and lower body panels a thorough rinse with COLD water. Using hot water would accelerate the reaction you’re trying to prevent. The goal is simply to flush the salt away.
- Ensure Adequate Ventilation: A humid, stagnant environment is rust’s best friend. Ensure your garage has good air circulation, either through a ventilation system or by cracking a window, to help dry the vehicle and lower ambient humidity.
- Remove Puddles Immediately: The salty meltwater that pools on the garage floor will evaporate, increasing the air’s salinity and humidity. Use a floor squeegee to direct this water out of the garage immediately.
- Use Absorbent Mats: Parking on large, absorbent garage floor mats can help capture meltwater and prevent it from spreading and evaporating.
- Monitor Humidity: For the ultimate in protection, use a simple hygrometer to monitor the garage’s relative humidity. Your goal is to keep it below 50% to significantly slow the rate of corrosion.
It’s a counter-intuitive concept, but one that is critical to mastering long-term vehicle preservation in a cold climate.
How to flush salt from hidden crevices without a pressure washer?
While annual professional rustproofing forms the foundation of your defense, ongoing maintenance during the winter months is crucial. The single most effective action you can take is to regularly flush salt deposits from your vehicle’s undercarriage. Many people assume this requires a powerful pressure washer, but this can be a mistake. High-pressure water can force its way past seals and into electrical connectors, causing new problems. It can also be too aggressive, potentially stripping away existing undercoatings or wax-based treatments. A gentler, more thorough approach using a standard garden hose is often superior.
The key is not pressure, but volume and coverage. You want to create a steady, gentle flow of water that can soak into crevices and dissolve and carry away salt deposits, rather than just blasting the surface. This method is safe, accessible to any homeowner, and highly effective when done correctly. For an added chemical advantage, mixing a small amount of baking soda into a water sprayer (about 1/4 cup per gallon) can help neutralize the acidic nature of road salt brine before the final flush.
This image demonstrates an undercarriage water broom, an inexpensive and highly effective attachment that turns a regular garden hose into a purpose-built flushing tool.

This tool, along with a proper nozzle, allows you to systematically remove the corrosive agents that accumulate during your daily winter commute. The following method ensures you are being thorough without causing unintended damage.
The Garden Hose Salt Flushing Method
- Use the Right Nozzle: Set your garden hose nozzle to a « shower » or « soaker » setting. Avoid the « jet » stream, as it can be too forceful. The goal is a gentle, high-volume rinse.
- Work from Top to Bottom: Start by thoroughly rinsing the wheel wells, getting water up behind the suspension components and fender liners. Then, work your way downward and inward.
- Focus on Key Areas: Spend extra time flushing the main frame rails, subframe members, suspension control arms, and the area around the fuel tank and brake lines. These are common areas for salt to collect.
- Achieve Complete Coverage: An undercarriage water broom attachment, which is essentially a set of wheels with upward-facing nozzles, is an excellent investment. It allows you to easily roll the sprayer under the entire vehicle for consistent, complete coverage.
- Final Flush: After focusing on specific areas, give the entire underbody one final, comprehensive flush to ensure all dissolved salt is washed away. Perform this routine at least bi-weekly during periods of heavy road salting.
This hands-on maintenance bridges the gap between annual treatments and ensures your vehicle’s structural components remain as free of corrosive agents as possible throughout the winter.
The hidden rust spots that make 80% of Ontario classics a bad investment
Nowhere is the insidious nature of road salt more evident than in the classic car market, particularly in provinces like Ontario. A classic car that looks pristine on the surface can be a financial time bomb, with hidden corrosion eating away at its structure. Decades of exposure to Canadian winters, even with periods of storage, can cause rust to develop in places that are completely invisible during a standard walk-around inspection. This is why a staggering number of classics sold in the rust belt are poor investments; the cost of proper rust repair can easily exceed the vehicle’s value.
Classic cars are particularly vulnerable due to their construction methods, which predate modern corrosion protection. They often have more complex body panels with intricate seams, fewer drainage holes, and materials that were not galvanized. Areas like cowl vents, designed to bring fresh air into the cabin, become perfect funnels for leaves, dirt, and salt, creating a damp, corrosive compost that rots the firewall from the inside out. The bottom of the ‘A’ pillars, hidden by the front fenders, and the spring perches on rear axles are other notorious failure points that can compromise the entire vehicle’s geometry.
Case Study: The Riviera’s Salty Secret
Classic car restorers in Ontario have countless horror stories, but one poignant example involves a Buick Riviera GS that had survived many Canadian winters. During restoration, the owner discovered that the rocker panels—the structural beams running beneath the doors—were completely filled with hardened road salt. The team literally pulled a softball-sized lump of crystallized salt from inside the panel. The trapped moisture had caused such severe perforation that the entire floor and trunk pan of the car had to be cut out and replaced, a job costing tens of thousands of dollars.
This kind of damage is often masked by unscrupulous sellers with thick layers of body filler and a fresh coat of paint. A shiny exterior can hide a crumbling foundation. Therefore, a specialized inspection process is non-negotiable when considering a classic car that has lived in Canada.
Classic Car Rust Detection Techniques
- The Magnet Test: This is the oldest trick in the book for a reason. Run a small, rubber-coated magnet along the lower 6 inches of all body panels, especially wheel arches and rocker panels. Areas where the magnet doesn’t stick are likely filled with non-metallic body filler, hiding rust holes.
- Check the Drains: Inspect cowl drains at the base of the windshield and any door drains. If they are clogged with debris, it is a major red flag for hidden firewall and floor pan rust.
- Inspect Hidden Pillars: The bottom of the ‘A’ pillars (where the front doors are hinged) is a critical structural area. Use a flashlight and a small mirror to inspect this area from inside the front wheel well.
- Examine Spring Perches: The points where the springs or leaf springs mount to the axle and frame are high-stress areas. Tap them lightly with a small hammer; a dull thud instead of a metallic ring can indicate severe internal corrosion.
- Look for Bleeding Seams: Closely inspect every seam where two body panels meet. Any sign of rust-colored staining « bleeding » through the paint indicates that corrosion is active within the seam.
In the classic car world, what you can’t see is almost always more important than what you can.
When does body rust become a structural safety failure?
For the average car owner, it can be difficult to distinguish between unsightly cosmetic rust and a genuine threat to safety. A rust bubble on a fender might be an eyesore, but a patch of scale on a subframe could be a sign of impending failure. Understanding the progression of rust is key to making informed decisions about repair, maintenance, and ultimately, whether a vehicle is safe to drive. From a material science standpoint, corrosion follows a predictable three-stage lifecycle, each with vastly different implications for the vehicle’s structural integrity.
The first stage, surface rust, is purely cosmetic. It occurs when a scratch or rock chip exposes bare metal to oxygen and moisture. It appears as a light orange-brown film on the surface and has not yet penetrated the metal’s thickness. This stage poses no structural threat and can typically be repaired with simple sanding, priming, and touch-up paint. The second stage is scale and pitting. This is where the corrosion has begun to eat into the metal, creating a pitted, flaky, and layered texture. The paint will be bubbling or peeling away as the iron oxide expands. At this point, the strength of the body panel or component is compromised, but it has not yet failed completely. This level of rust requires professional attention, involving grinding the metal back to a clean surface before repair.
The third and most dangerous stage is perforation. This is when the rust has eaten completely through the metal, creating a hole. Any perforation on a structural component is a critical safety failure. The component has lost its ability to manage stress and load, making the vehicle unsafe. To clarify these distinctions, the following table breaks down the three stages of rust.
| Stage | Description | Structural Impact | Repair Viability |
|---|---|---|---|
| Surface Rust | Cosmetic oxidation on paint surface near scratches | None – aesthetic only | Easy DIY sand and repaint |
| Scale/Pitting | Rust penetrating body panels, removing paint | Compromised strength but not critical | Professional repair needed |
| Perforation | Holes through metal, structural compromise | Critical safety failure | Panel replacement or vehicle retirement |
Provincial safety regulations provide a clear, non-negotiable line in the sand. In Canada, safety standards are strict about the location of any perforation. As a certified inspector in Ontario would confirm, the rules are absolute when it comes to the vehicle’s core structure.
Any perforation or rust-induced crack within 12 inches of a suspension or steering mounting point constitutes an immediate safety failure.
– Provincial Safety Inspector Standards, Ontario Safety Standards Certificate (SSC) Guidelines
This knowledge transforms your assessment from a simple visual check into a structured safety audit.
Key Takeaways
- The most effective rustproofing is a light, annual oil spray applied in late summer to a clean, dry vehicle, leveraging capillary action for deep penetration.
- Parking a salt-covered car in a heated garage can accelerate corrosion by 4-5 times; a cold-water rinse protocol is mandatory to prevent this.
- Any rust perforation (hole) within 12 inches of a suspension or steering mount is an immediate structural safety failure and will make a vehicle illegal to operate in provinces like Ontario.
The « Million Kilometer » Mindset: Fighting Salt and Thermal Shock
Achieving extreme longevity from a vehicle in Canada is not a matter of luck; it is the result of a disciplined, proactive philosophy. The « Million Kilometer Mindset » shifts the owner’s perspective from making annual repairs to implementing a long-term preservation strategy. It treats the vehicle not as a disposable appliance, but as a complex mechanical system that can be maintained indefinitely with the right inputs. This mindset accepts the harsh realities of the Canadian environment—corrosive road salt and extreme thermal shock—and builds a defense-in-depth to combat them systematically.
This approach goes far beyond a single annual rustproofing appointment. It integrates a series of interlocking habits that collectively neutralize threats before they can cause cumulative damage. It involves diligent cleaning, regular inspection, and reinforcing vulnerable areas. Adopting this mindset means you are always thinking about the long-term effects of your actions, from choosing where to park to deciding when to wash the car. It is this consistency that separates vehicles that are sent to the scrapyard after ten years from those that are still reliable and structurally sound after twenty.
Case Study: The 460,000 km Dodge Caravan
Proof that this mindset works can be found in the story of a 1986 Dodge Caravan that was driven in the harsh conditions of Canadian winters and hot, humid summers. Through a consistent regimen of annual rust protection and diligent maintenance, the vehicle reached 460,000 kilometers over 22 years with virtually zero body rust. This achievement, on a vehicle from an era with far less sophisticated factory protection, is a testament to the power of a relentless and proactive maintenance strategy.
The core of this strategy is a non-negotiable schedule that treats rust prevention with the same seriousness as oil changes or tire rotations. It is a documented, repeatable process designed to protect not just the vehicle’s function, but also its future resale value.
The Advanced Million-Kilometer Maintenance Schedule
- The Shield (Annual): Schedule an annual, high-quality, dripless oil spray application every late August or early September, when the vehicle is warm and dry for maximum product penetration.
- The Cleaning (Bi-weekly in Winter): Perform a low-pressure undercarriage flush with cold water at least every two weeks during the road salt season to remove corrosive deposits.
- The Upkeep (Biannual): Twice a year (spring and fall), perform a detailed inspection of all suspension components, brake lines, and fuel lines, lubricating components as needed.
- The Reinforcement (As Needed): Apply a thicker fluid film or wax-based protectant to specific high-exposure areas like exposed bolt heads, brake line fittings, and suspension adjustment points for an extra layer of defense.
- The Logbook (Always): Document all treatments and inspections with dates and photos. This detailed service history is invaluable for proving the vehicle’s condition and maximizing its resale value.
By transforming your approach from reactive repair to proactive preservation, you can fundamentally alter your vehicle’s destiny, ensuring it remains safe, reliable, and structurally sound for decades to come.